Perceptronics Beta
3D picking for Universal Robots. Tell the robot the part's size; it finds every one and puts the gripper on it.
Perceptronic is a URCap for PolyScope 5 and PolyScope X. Its 3D Pick program node uses a depth camera on the wrist to find every part of the size you enter, numbers them in the pick order you choose, and moves the tool to the grip on each one. Your program opens and closes the gripper.
PolyScope 5 Beta
Download perceptronic-ps5-0.8.0.urcap sha256 ec9df7bcce76f2ad4bc25feff1f03a9802bfd926b4334852531e98ac99dd5ca6PolyScope X Beta
Download perceptronic-0.6.0.urcapx sha256 e97e9e93002d839a2d46f466af5ea012d9ddd5f0601781d1517b55becc8c36ca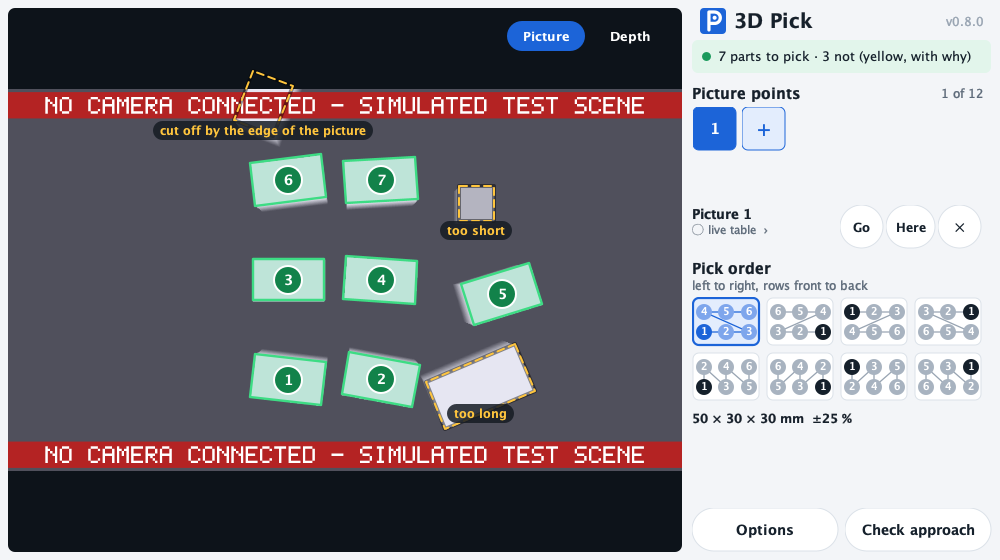
When to use it
Use it where parts of one known size arrive on a flat surface but not in a known position.
Loose parts on a table or tray
Parts are set down by hand, in any position and at any angle. The robot finds each one instead of relying on a fixture or a taught grid.
Machine tending infeed
Blanks are placed roughly in front of a CNC or a press. The node puts the gripper on the next blank; the rest of your program loads it.
Instead of a fixture or pallet pattern
When the part changes, enter its new length, width and height on the pendant. There is no nest to machine and no pattern to re-teach.
Not for
- Bin picking: parts piled on or leaning against each other. Parts must lie separately on a flat surface.
- Shapes other than boxes and cylinders standing on end.
- Transparent or mirror-like parts that a depth camera cannot see.
- Parts closer than 0.25 m to the camera.
- Telling apart parts of the same size. It measures; it does not read colour, labels or markings.
What you need
The URCap is free. It needs a depth camera on the wrist and a small computer beside the robot to read it.
| Item | Detail | From |
|---|---|---|
| Robot | A Universal Robots e-Series arm or UR20, on PolyScope 5 or PolyScope X. | You |
| Gripper | Any gripper your program can open and close. The node never drives it. | You |
| Depth camera | RealSense D435 on a USB 3 port. | Kit |
| Camera bracket | Printed adapter that fits between the tool flange and the gripper. Versions for the e-Series flange (ISO 9409-1-50-4-M6) and the UR20. | Kit |
| Camera computer | A small Linux computer beside the robot (Raspberry Pi class, arm64), on the robot's network. It runs the camera software as a service. | Kit |
| Cables and fasteners | High-flex USB 3 cable along the arm, shielded Ethernet, DIN-rail power supply, camera and tool bolts. | Kit |
| URCap | The download above, free and open source (MIT). | This page |
The kit comes from Advin. To ask for one, write to nick@advin.io with your robot model, PolyScope version and gripper.
Specs and limits
What the node does, and where it stops.
| PolyScope 5 | 5.4 to 5.26 (e-Series), URCap 0.8.0. One program node (3D Pick), one installation node, one toolbar button with the live picture. |
|---|---|
| PolyScope X | 10.8 to 10.14, URCap 0.6.0. The same 3D Pick node; both write the same URScript. |
| Robots | UR3e, UR5e, UR7e, UR10e, UR12e, UR16e, UR20. |
| Part shapes | Box, or cylinder standing on its end. |
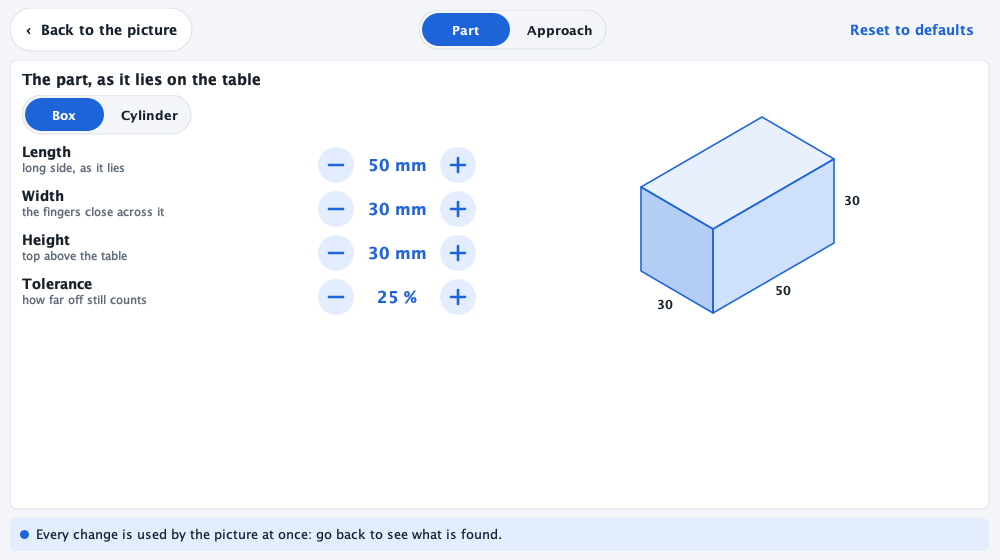
| Part size | 5 to 500 mm on each of length, width and height. |
| Size tolerance | 5 to 100 %, default 25 %, never tighter than ±5 mm. |
| Detection | By volume, from depth alone: whatever stands the part's height above the surface with a top face of its length and width. Colour is not used. |
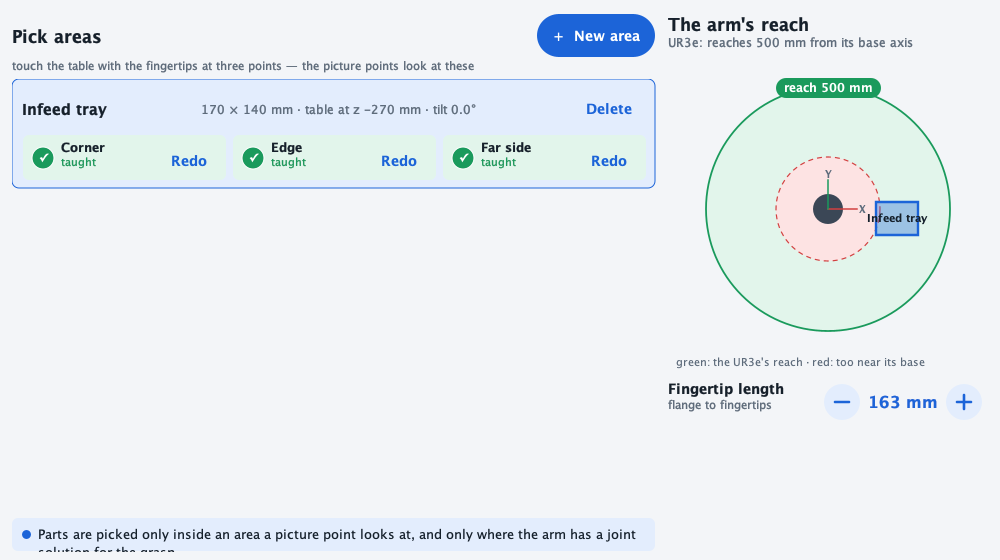
| Surface | Flat. Either a pick area taught with three fingertip touches, or the table found live. |
| Picture points | Up to 12 per node. The arm visits each to look for parts. |
| Pick order | Eight patterns: by rows or by columns, from any corner. |
| Approach | Straight down, fingertips 25 mm above the part's top by default, then down to the grip. Fingers close across the short side; a box can be gripped across its long side instead. |
| Grip check | A part is skipped unless there is 20 mm clear on each side the fingers come down on. |
| Reach | Checked per part by the arm's kinematics. A part with no joint solution is skipped. |
| Rejected parts | Shown in yellow with the reason: off size (too long, too short, too wide, too narrow, too tall, too flat), two parts touching, out of reach, no room for a finger, outside the pick area, cut off by the edge of the picture. |
| Camera range | No closer than 0.25 m to the parts. |
| Program interface | One node, no child nodes. Sets rs_pick_found when the tool is at the grip and rs_pick_loc to the picture point the part came from. |
| Gripper | Not controlled. Put your open-gripper node before 3D Pick and your close-gripper node after it. |
| Network | Robot to camera computer on the cell's own network: TCP 7621 (HTTP) and 7622 (pick requests). No internet connection is needed to run. |
| License | MIT. Source on GitHub. |
Install
From a USB stick, on the pendant. Do it once per robot, and again to update.
PolyScope 5
- Copy
perceptronic-ps5-0.8.0.urcapto the top level of a FAT32 USB stick and plug it into the pendant. - ☰ → Settings → System → URCaps.
- Tap +, select the file, tap Open.
- Tap Restart.
- Installation → URCaps → Perceptronic: enter the camera computer's address, for example
http://192.168.3.10:7621. The live picture appears.
PolyScope X
- Copy
perceptronic-0.6.0.urcapxto a USB stick and plug it into the pendant. - ☰ → System Manager → URCaps, and unlock it with the admin password.
- Add a URCap and select the file.
- When it is listed, ☰ → Reload.
- Application → Perceptronic: enter the camera computer's address under Cockpit and tap Save.
Then add the node to a program: Program → URCaps → 3D Pick, inside a loop, with your open-gripper node before it and your close-gripper node after it. Mounting the camera, setting up the camera computer and calibrating are covered in the repository.